
For all of my photography loving readers... This is for you! If you have no interest in photos, you probably won't enjoy this post very much. :)
As I am becoming more and more Photoshop savvy, I'm going to start showing off the processing work I do, in addition to the final product that I come up with.
I love this time of year because the family is getting together all the time, but from the photography side of it all, it can be quite a challenge to shoot photos indoors (without flash, of course). It becomes especially challenging when the available lighting is warm and gives off strong yellow casts.
To show the situation I'm talking about, I did a quick before/after comparison with a photo of my sweet boy, Ralphie. He's always a willing photo subject!!
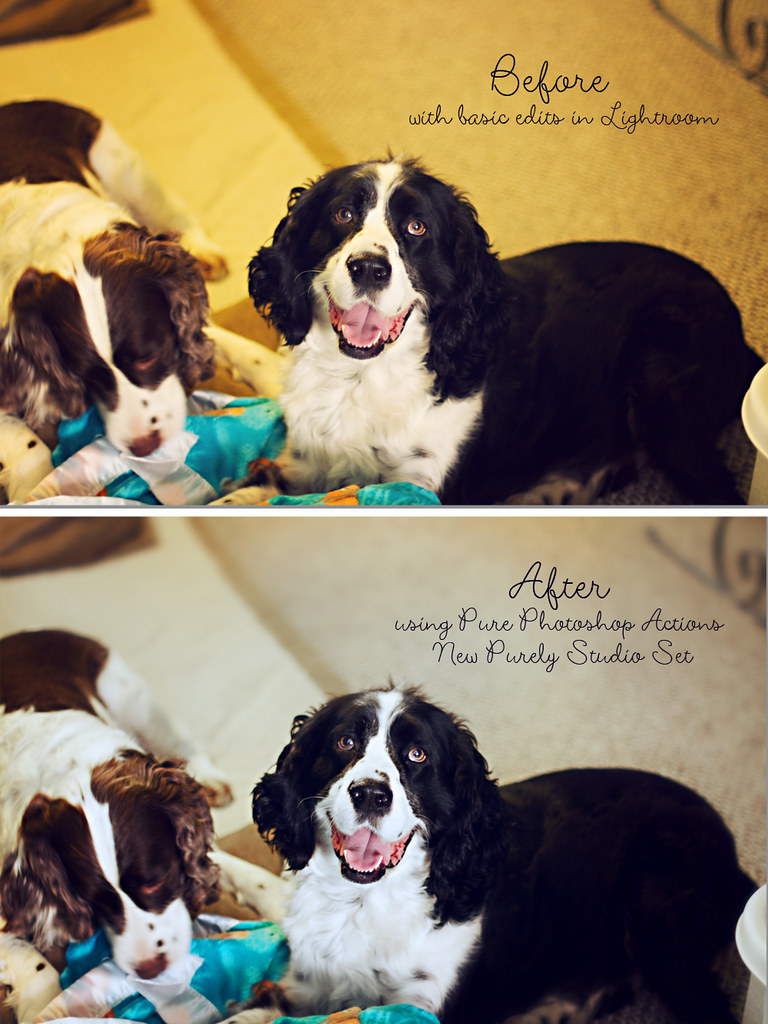
The "Before" photo is not straight out of camera. I shoot 100% RAW, so I did basic fixes in Lightroom before sending it to Photoshop for the "real" editing. If you don't know what a RAW file is, and you'd like to, google it! There are a ton of resources out there. I can tell you though, it is quite beneficial to shoot RAW, as you have WAYYYY more control over the exposure and white balance of your photos.
The first edits I did in Lightroom are pretty basic, and I do them to pretty much every photo I take. I started by adjusting the exposure (brightened it up a bit) and tweaked the white balance (over color cast of the photo). As you can see though, Lightroom didn't give me enough control to do all the fixes that I need to do to clean it up to my specifications (I'm quite a perfectionist)
From there I export the photo as a JPEG and send it to Photoshop. This is what I prefer to do, as Photoshop gives me a lot more control and many many more options for editing. For this particular snapshot, I didn't want to do any creative editing (vintage tones/hazes), but I did need to do more work with the white balance to have it meet my specifications.
This is where my newest action set came into play. I used actions from Pure Photoshop Actions, more specifically, their new set called, Purely Studio. There is an action in that set called, "Cast Away" that helped me remove the horrible yellow tinge that was taking over the photo. I really love this action because there are many layers that you can paint on the effect depending on what color is giving a cast to your photo. So, I selected the "yellow" layer and painted it all over the photo at about 20% opacity. I like to paint at a low opacity and build up the effect, so it does not appear too obvious. This worked wonders, especially on the pup's fur and the white(ish) background.
From there I ran a few more actions for blurring the background a bit (very slight) and overall sharpening. That's one thing to note about RAW shooting. You MUST sharpen your photos because RAW files are not sharpened in camera like JPEGS are.
The last step I did was use a template from Paint the Moon Photoshop Actions to make the before/after comparison. I plan on using a lot more of these in the future, so you are able to see the hard work that goes into custom editing photos. It's time consuming, and that's why photographers must charge what they do. Many, many hours go into editing to make photos look so special!!
Thanks for reading, and let me know if you enjoyed hearing about my editing process!
Merry Christmas All, and Happy Photo Taking!!

If you'd like to check out the goodies I used, check out the links below:
Pure Photoshop Actions Purely Studio Set :
They are having a sale on this set and all of their actions right now! I use their goodies for a lot of my edits!
Paint the Moon Photoshop Actions Before/After Template:
This is a link to her blog post about the action set that contains the template that I used. It's FREE, so if you have Photoshop or Elements, pick it up today!!
2 comments:
Wow, I'm impressed. I hate the struggle of trying to "cool down" photos and this is just amazing. One day I will take the time to tackle that project because all of these yellowy photos are making me a crazy lady. :) Thanks for sharing.
-Sara-
Merry Christmas to you and the pups!
Post a Comment